Named Entity Recognition (NER) has taken massive strides with transformer models, excelling in languages like English. But when it comes to Arabic, the road becomes more complex. The richness of Arabic morphology, coupled with the lack of large labeled datasets, presents a significant challenge.
In this blog, we dive into fine-tuning a pre-trained transformer model for Arabic NER, using a practical, reproducible approach. By the end, you’ll see how this model can revolutionize Arabic text analysis in industries like healthcare, law, and beyond.
Challenges in Arabic NER and Existing Solutions
While Named Entity Recognition for Arabic has been explored through traditional methods such as rule-based systems and custom-trained models, these approaches often fall short in capturing the full complexity of the language. Arabic’s intricate morphology, the presence of diacritics, and the challenge of aligning named entities during tokenization make the task significantly more difficult compared to languages like English.
These traditional methods struggle to generalize across diverse texts and fail to effectively handle ambiguous entities. The result is inconsistent performance, especially in domain-specific applications like healthcare or legal text analysis, where precision is critical.
In this post, we aim to address these limitations by leveraging pre-trained transformer models. Fine-tuning these models for specific entity types can offer a more accurate and scalable solution to Arabic NER. This approach not only tackles the linguistic challenges head-on but also improves performance in recognizing key entities such as locations, people, and organizations.
Step-by-step approach
We will fine-tune Marefa-NER, a large Arabic pre-trained model, targeting nine different types of entities. The process involves the following steps, each critical to building a robust NER model.
1. Installing the Libraries
To begin, we need to install all the necessary libraries while ensuring there are no dependency conflicts between them. The library fsspec has specific version requirements that must be met for compatibility with other libraries like gcsfs and datasets.
- fsspec: For filesystem management.
- gcsfs: For Google Cloud Storage access.
- transformers: To load pre-trained models and tokenizers for Named Entity Recognition (NER).
- sentencepiece: For tokenizing text, especially useful for handling Arabic text.
					!pip uninstall fsspec -y
!pip install fsspec==2023.6.0 gcsfs==2023.6.0 transformers==4.29 datasets==2.14.5 sentencepiece==0.1.99
!pip install -q seqeval==1.2.2 transformers==4.28.0 datasets==2.14.5 sentencepiece==0.1.99 accelerate==0.22.0
These libraries ensure seamless execution of the fine-tuning process. Hugging Face’s transformers and datasets, along with other utilities like sentencepiece for tokenization, are essential for handling Arabic text.
We will also import all the essential libraries required for setting up the Named Entity Recognition (NER) model, tokenizer, dataset, and evaluation metrics:
- AutoTokenizer, AutoModelForTokenClassification, and AutoConfig: These components allow us to load the pre-trained tokenizer and model, along with the configuration settings, for NER tasks.
- Trainer and TrainingArguments: These are core components for training and fine-tuning the model. They define the training loop and manage optimization, learning rate scheduling, and model checkpoints.
- DataCollatorForTokenClassification: Helps in preparing batches of data for token classification (NER) during training. This is especially useful when working with varying-length sequences.
- load_dataset and load_metric: Allow us to easily load datasets and evaluation metrics from Hugging Face’s large collection of prebuilt datasets and tools, making it easier to train and evaluate the model.
- Logging: The logging system is configured to track and display important information about the model’s progress, while suppressing unnecessary outputs from the transformers library by setting the log level to WARNING.
					from transformers import AutoTokenizer, AutoModelForTokenClassification, AutoConfig
from transformers import AutoModelForSequenceClassification, TrainingArguments, Trainer
from transformers import DataCollatorForTokenClassification
from datasets import load_dataset, load_metric, Dataset, DatasetDict

import numpy as np
import logging

logging.basicConfig(level=logging.INFO)
transformers_logger = logging.getLogger("transformers")
transformers_logger.setLevel(logging.WARNING)
2. Tokenizing Data and Aligning Labels
Now we need to define a function, tokenize_and_align_labels, that tokenizes the input text and aligns the entity labels with the tokenized text, ensuring that each token is assigned the correct label (such as person, location, etc.).
Special tokens, such as padding or separators, are ignored during training by assigning them the label -100.
					def tokenize_and_align_labels(examples):
    tokenized_inputs = tokenizer(examples["tokens"], truncation=True, is_split_into_words=True, padding=True ,max_length=512)

    labels = [] #to store the final aligned labels
    for i, label in enumerate(examples[f"{task}_tags"]):
        #word_ids should retrieve word indices for the tokenized input so wecan map each token back to the original word
        word_ids = tokenized_inputs.word_ids(batch_index=i)

        previous_word_idx = None
        label_ids = []

        for word_idx in word_ids:
            # Special tokens have a word id that is None. We set the label to -100 so they are automatically
            # ignored in the loss function.
            if word_idx is None:
                label_ids.append(-100)
            # We set the label for the first token of each word.
            elif word_idx != previous_word_idx:
                label_ids.append(label[word_idx])
            # For the other tokens in a word, we set the label to either the current label or -100, depending on
            # the label_all_tokens flag.
            else:
                label_ids.append(label[word_idx] if label_all_tokens else -100)
            previous_word_idx = word_idx

        labels.append(label_ids)

    tokenized_inputs["labels"] = labels
    return tokenized_inputs
3. Calculating Evaluation Metrics
At this stage, we will define two functions: compute_metrics and compute_results. The first one is designed to evaluate the model during training or validation; the second one will evaluate the model’s performance on the entire dataset. After the fine-tuning or training process, this function should compute predictions for the dataset, align the true labels with the predicted labels, and calculate evaluation metrics.
So let’s start with the first function.
					def compute_metrics(p):
    global model_name, current_epoch

    predictions, labels = p
    predictions = np.argmax(predictions, axis=2)

    # Remove ignored index (special tokens)
    # custom_labels[p]: Converts the numeric prediction p into its corresponding human-readable label (e.g., "B-Person", "O").
    true_predictions = [
        [custom_labels[p] for (p, l) in zip(prediction, label) if l != -100]
        for prediction, label in zip(predictions, labels)
    ]
    true_labels = [
        [custom_labels[l] for (p, l) in zip(prediction, label) if l != -100]
        for prediction, label in zip(predictions, labels)
    ]

    results = metric.compute(predictions=true_predictions, references=true_labels)
    metric_results = {
        "precision": results["overall_precision"],
        "recall": results["overall_recall"],
        "f1": results["overall_f1"],
        "accuracy": results["overall_accuracy"],
    }

    return metric_results
As the function compute_results evaluates the model’s performance on the entire dataset, can you guess its inputs? … take a moment and think about it.

The inputs are the following:
- trainer: The Hugging Face Trainer object.
- tokenized_ds: The entire validation or test dataset, which is tokenized and ready for model evaluation.
- metric: The metric used for evaluation (e.g., seqeval).
- custom_labels: A list of custom NER labels (e.g., “B-herb_name”, “O”).
So here’s how it will look like
					def compute_results(trainer, tokenized_ds, metric, custom_labels):
    predictions, labels, _ = trainer.predict(tokenized_ds)
    predictions = np.argmax(predictions, axis=2)
    # Remove ignored index (special tokens)
    true_predictions = [
        [custom_labels[p] for (p, l) in zip(prediction, label) if l != -100]
        for prediction, label in zip(predictions, labels)
    ]
    true_labels = [
        [custom_labels[l] for (p, l) in zip(prediction, label) if l != -100]
        for prediction, label in zip(predictions, labels)
    ]

    results = metric.compute(predictions=true_predictions, references=true_labels)
    return results
The argmax function in both functions is used to convert Logits to predictions since the raw model output is in the form of logits, which represent the model’s confidence for each class (NER label), and we used axis=2 because this is a 3D Tensor where the 3rd element is the NER Labels.
And now it’s Data time!
4. Loading and pre-processing data
You can download a sample of the ner-train.json from here and upload it to your runtime environment. This file contains labeled training data for the Named Entity Recognition task, which will be used to fine-tune our pre-trained model.
					import json
import itertools

# Path to the uploaded file (use the full path if needed)
file_path = "/content/ner-train.json"

# Open and read the JSON file
with open(file_path) as src:
    ner_annotated_data = json.loads(src.read())
And now we’re getting serious!
This will be a long code but we’ll explain it don’t worry.

The goal here is to process the annotated NER dataset to extract tokens and their corresponding NER tags in BIO format. The main steps include:
- Tokenization: The input text is split into individual tokens, and the corresponding ranges (start and end positions) of the tokens are identified.
- Assigning NER Tags: For each token, we check if it falls within the range of any annotated entity. If it does, the appropriate NER tag (such as “Person”, “Location”, etc.) is assigned. If not, the “O” tag (outside of entity) is assigned.
- BIO Formatting: The NER tags are formatted using the BIO (Beginning-Inside-Outside) scheme:
- B- (Beginning): Assigned to the first token of an entity.
- I- (Inside): Assigned to subsequent tokens of the same entity.
- O: Assigned to tokens that are not part of any entity.
This step ensures that we have properly formatted tokens and their BIO tags, which will be used to train and evaluate the NER model.
					# create  lists to store NER tags and tokens for each sentence.
all_ner_tags, all_ner_tokens = [], []
#o_tag: This is the "Outside" tag (O), used to mark tokens that are not part of any entity.
o_tag = "O"

#Processing Each Record in the Annotated Data
for rec in ner_annotated_data:
    ner_tags, ner_tokens = [], []

    #Extract the sentence (text) from the record.
    text = rec["data"]["text"]
    #Skipping Records Without Valid Annotations:
    #This checks if there are no annotations in the current record or if the annotation result is missing or empty. If any of these conditions are true, the code skips this record and moves to the next one.
    if len(rec["annotations"]) == 0 or "result" not in rec["annotations"][0] or len(rec["annotations"][0]["result"]) == 0:
        continue

    # sort rec["annotations"][0]["result"] based on start index
    rec["annotations"][0]["result"].sort(key=lambda x: x["value"]["start"])
    # x["value"]["start"]: Refers to the starting position of the entity in the text.

    # collect all ranges with their labels
    ranges = []
    for r in rec["annotations"][0]["result"]:
        ranges.append((range(r["value"]["start"], r["value"]["end"]+1), r["value"]["labels"][0]))

    # split text into tokens
    tokens = text.split()
    token_ranges = []
    c = 0 #keeps track of the character position of each token
    for i, token in enumerate(tokens):
        token_ranges.append( (range(c, c+len(token)), token) )
        c += len(token) + 1

    # find all tokens that are in the ranges
    for token_range in token_ranges:
        #Before checking if a token matches an entity, the flag is_found is set to False. This means that, by default, we assume the token does not belong to any entity.
        is_found = False

        for sub_range in ranges:
            if all(e in sub_range[0] for e in token_range[0]):
                ner_tags.append(sub_range[1])
                ner_tokens.append(token_range[1])
                is_found = True
                break

        # If a token is not found in any entity range after the inner loop,
        #this means that the token does not correspond to any named entity.
        if not is_found:
            ner_tags.append(o_tag)
            ner_tokens.append(token_range[1])

    # format BI prefix
    for i, tag in enumerate(ner_tags):
        #processing the first token
        if i == 0 and ner_tags[i] != o_tag:
            ner_tags[i] = f"B-{ner_tags[i]}"
            continue

        # skipping tokens labeled as O
        if i == 0 or ner_tags[i] == o_tag:
            continue

        #handling sub sequent tokens
        if ner_tags[i-1].replace("B-","").replace("I-","") == ner_tags[i]:
            ner_tags[i] = f"I-{ner_tags[i]}"
        else:
            ner_tags[i] = f"B-{ner_tags[i]}"


    all_ner_tags.append(ner_tags)
    all_ner_tokens.append(ner_tokens)
We still need to:
- Split the data
- Extract unique NER tags
- Convert preprocessed data into Hugging Face Dataset format
- Fine tune the model
					# Split the data into training and development sets

train_texts = all_ner_tokens[:8]
train_tags = all_ner_tags[:8]

dev_texts = all_ner_tokens[8:]
dev_tags = all_ner_tags[8:]

# Extract unique NER tags from the dataset
set(itertools.chain.from_iterable(all_ner_tags))

# marefa-ner base checkpoint
base_checkpoint = "marefa-nlp/marefa-ner"
task = "ner"
#all tokens, including subword tokens, should be labeled
label_all_tokens = True
seed = 101

# where to save the new model and its logs
new_model_path = f"./finetuned-ner"
logs_path = f"./logs"

# seqeval metric
metric = load_metric("seqeval")

## all of the tags in your dataset
custom_labels = ["O", "B-herb_name", "I-herb_name", "B-case", "I-case", "B-side_effect", "I-side_effect"]

device = "cuda:0"

# Convert preprocessed data into Hugging Face Dataset format
datasets = DatasetDict({
    "train": Dataset.from_dict({
        "tokens": train_texts,
        "ner_tags": [ [ custom_labels.index(r) for r in rec ] for rec in train_tags ]
    }),
    "dev": Dataset.from_dict({
        "tokens": dev_texts,
        "ner_tags": [ [ custom_labels.index(r) for r in rec ] for rec in dev_tags ]
    }),
})
5. Fine-Tuning the Model
With our data prepared and tokenized, we move on to fine-tuning the Marefa-NER model for our NER task. Here’s how we set up the model training:
					from transformers import set_seed

set_seed(seed)
# Load the tokenizer and pre-trained model for token classification

tokenizer = AutoTokenizer.from_pretrained(base_checkpoint)
model = AutoModelForTokenClassification.from_pretrained(base_checkpoint,
                                                        num_labels=len(custom_labels),
                                                        ignore_mismatched_sizes=True).to(device)

# Tokenize and align the labels for the dataset
tokenized_datasets = datasets.map(tokenize_and_align_labels, batched=True)

# configure your fine-tuning process

args = TrainingArguments(
    new_model_path,
    logging_dir=logs_path,
    evaluation_strategy = "epoch",
    logging_strategy= "epoch",
    save_strategy= "no",
    learning_rate= 1e-4,
    load_best_model_at_end= False,
    per_device_train_batch_size= 4,
    per_device_eval_batch_size= 4,
    num_train_epochs= 10,
    weight_decay= 0.01,
    push_to_hub= False,
)
# Data collator for dynamic padding during training

data_collator = DataCollatorForTokenClassification(tokenizer)
Last, we need to set up the Hugging Face Trainer for model training and evaluation and train the model
					trainer = Trainer(
    model,
    args,
    train_dataset=tokenized_datasets["train"],
    eval_dataset=tokenized_datasets["dev"],
    data_collator=data_collator,
    tokenizer=tokenizer,
    compute_metrics=compute_metrics
)


train_result = trainer.train()
dev_results = compute_results(trainer, tokenized_datasets["dev"], metric, custom_labels)
Results should look something like this:
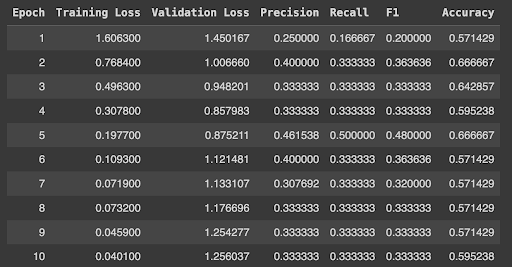
You can save your model to your temporary storage or drive to load it again whenever needed.
					from google.colab import drive
drive.mount('/gdrive')

!mkdir -p /gdrive/MyDrive/finetuned-ner-model-herbs

new_model_path = "/gdrive/MyDrive/finetuned-ner-model-herbs"

trainer.save_model(f"{new_model_path}/best")
tokenizer.add_tokens(custom_labels)
tokenizer.save_pretrained(f"{new_model_path}/best")
6. Almost done! Testing time🥳
In order to test the model, we will follow these steps:
- Define the NER Extraction function
- Load the fine-tuned model
- Run inferences
Define the NER Extraction function
					from transformers import AutoTokenizer, AutoModelForTokenClassification
import torch

import numpy as np
import nltk
nltk.download('punkt')
from nltk.tokenize import word_tokenize

# NER extraction function


def _extract_ner(text: str, model: AutoModelForTokenClassification,
                 tokenizer: AutoTokenizer, start_token: str="▁"):
    # Tokenize the input text
    tokenized_sentence = tokenizer([text], padding=True, truncation=True, return_tensors="pt")
    tokenized_sentences = tokenized_sentence['input_ids'].numpy()

    # Get model predictions
    with torch.no_grad():
        output = model(**tokenized_sentence.to("cuda:0"))

    last_hidden_states = output[0].cpu().numpy()
    label_indices = np.argmax(last_hidden_states[0], axis=1)

    # Convert token IDs to actual tokens
    tokens = tokenizer.convert_ids_to_tokens(tokenized_sentences[0])
    special_tags = set(tokenizer.special_tokens_map.values())

    grouped_tokens = []
    for token, label_idx in zip(tokens, label_indices):
        if token not in special_tags:
            if not token.startswith(start_token) and len(token.replace(start_token,"").strip()) > 0:
                grouped_tokens[-1]["token"] += token
            else:
                grouped_tokens.append({"token": token, "label": custom_labels[label_idx]})

    # Extract entities and group tokens belonging to the same entity
    ents = []
    prev_label = "O"
    for token in grouped_tokens:
        label = token["label"].replace("I-","").replace("B-","")
        if token["label"] != "O":

            if label != prev_label:
                ents.append({"token": [token["token"]], "label": label})
            else:
                ents[-1]["token"].append(token["token"])

        prev_label = label

    ## Combine multi-token entities
    ents = [{"token": "".join(rec["token"]).replace(start_token," ").strip(), "label": rec["label"]}  for rec in ents ]

    return ents
Load the fine-tuned model
					# Define the path to the fine-tuned model

new_model_path = f"./finetuned-ner"
# new_model_path = "/gdrive/MyDrive/finetuned-ner-model-herbs"

device = "cuda:0"

# Custom labels used in the model
custom_labels = ["O", "B-herb_name", "I-herb_name", "B-case", "I-case", "B-side_effect", "I-side_effect"]

# Load the tokenizer and model
model_cp = f"{new_model_path}/best"

tokenizer = AutoTokenizer.from_pretrained(model_cp)
model = AutoModelForTokenClassification.from_pretrained(model_cp, num_labels=len(custom_labels)).to(device)
Run inferences
					sample = "تعتبر نبته المرمرية من النباتات المفيدة لتجنب آلام البطن و حصوات الكلية"

ents = _extract_ner(text=sample, model=model, tokenizer=tokenizer, start_token="▁")

print(ents)
This should output the following
[{'token': 'المرمرية', 'label': 'herb_name'}, {'token': 'آلام البطن', 'label': 'case'}, {'token': 'حصوات الكلية', 'label': 'case'}]
The Future of Arabic NER: Key Takeaways and Next Steps
Fine-tuning pre-trained transformers for Arabic NER offers a significant leap over traditional methods, improving accuracy and handling the language’s complexity. Our approach has shown success in recognizing entities across domains like healthcare and legal analysis.
Moving forward, expanding the dataset to cover more diverse entities and integrating NER with other NLP techniques, such as sentiment analysis, could further enhance the model’s capabilities. As datasets grow and transformer models evolve, the potential for Arabic NER in automating text analysis across industries will only increase.